08redis与SpringBoot集成
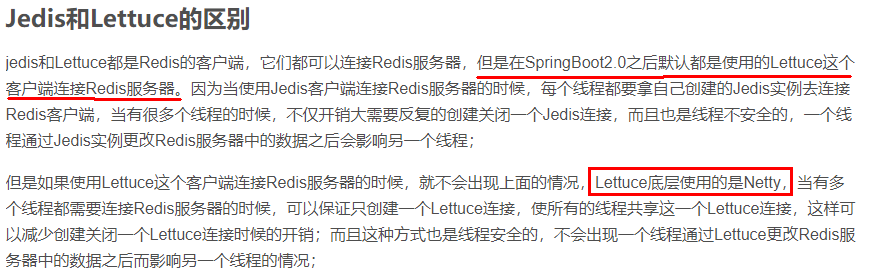
jedis-lettuce-RedisTemplate三者的联系
# 1.本地Java连接Redis常见问题,小白注意
- bind配置请注释掉
- 保护模式设置为no
- Linux系统的防火墙设置
- redis服务器的IP地址和密码是否正确
- 忘记写访问redis的服务端口号和auth密码
# 2.集成Jedis
# 2.1 是什么
Jedis Client是Redis官网推荐的一个面向java客户端,库文件实现了对各类API进行封装调用
# 2.2 步骤
创建maven工程
引用依赖
<parent>
        <groupId>org.springframework.boot</groupId>
        <artifactId>spring-boot-starter-parent</artifactId>
        <version>3.2.4</version>
        <relativePath/>
    </parent>

    <properties>
        <maven.compiler.source>21</maven.compiler.source>
        <maven.compiler.target>21</maven.compiler.target>
        <project.build.sourceEncoding>UTF-8</project.build.sourceEncoding>
    </properties>

    <dependencies>
        <dependency>
            <groupId>org.springframework.boot</groupId>
            <artifactId>spring-boot-starter-web</artifactId>
        </dependency>
        <dependency>
            <groupId>org.projectlombok</groupId>
            <artifactId>lombok</artifactId>
        </dependency>


        <dependency>
            <groupId>redis.clients</groupId>
            <artifactId>jedis</artifactId>
        </dependency>
    </dependencies>

<build>
        <plugins>
            <plugin>
                <groupId>org.springframework.boot</groupId>
                <artifactId>spring-boot-maven-plugin</artifactId>
            </plugin>
        </plugins>
    </build>
1
2
3
4
5
6
7
8
9
10
11
12
13
14
15
16
17
18
19
20
21
22
23
24
25
26
27
28
29
30
31
32
33
34
35
36
37
38测试案列
@Slf4j
public class JedisDemo {


    public static void main(String[] args) {
        Jedis jedis = new Jedis
                ("192.168.1.106", 6379);

        jedis.auth("123456abc");
        log.info("redis conn status:{}","连接成功");
        log.info("redis ping retvalue:{}",jedis.ping());

        jedis.set("k1","jedis");
        log.info("k1 value:{}",jedis.get("k1"));

        Set<String> keys = jedis.keys("*");
        keys.forEach(System.out::println);


        jedis.set("k3", "hello-k3");
        System.out.println(jedis.get("k3"));
    }
}
1
2
3
4
5
6
7
8
9
10
11
12
13
14
15
16
17
18
19
20
21
22
2321:24:33.608 [main] INFO org.clxmm.demo.JedisDemo -- redis conn status:连接成功 21:24:33.623 [main] INFO org.clxmm.demo.JedisDemo -- redis ping retvalue:PONG 21:24:33.629 [main] INFO org.clxmm.demo.JedisDemo -- k1 value:jedis1
2
3
# 3.集成lettuce
Lettuce是一个Redis的Java驱动包,Lettuce翻译为生菜,没错,就是吃的那种生菜。
# 3.1 连接步骤
添加maven依赖
<dependency>
    <groupId>io.lettuce</groupId>
    <artifactId>lettuce-core</artifactId>
</dependency>
1
2
3
4测试类
public static void main(String[] args) {
        //使用构建器 RedisURI.builder
        RedisURI uri = RedisURI.builder()
                .redis("192.168.1.106")
                .withPort(6379)
                .withAuthentication("default","123456abc")
                .build();
        //创建连接客户端
        RedisClient client = RedisClient.create(uri);
        StatefulRedisConnection conn = client.connect();
        //操作命令api
        RedisCommands<String,String> commands = conn.sync();


        //keys
        List<String> list = commands.keys("*");
        for(String s : list) {
            log.info("key:{}",s);
        }
        //String
        commands.set("k1","1111");
        String s1 = commands.get("k1");
        System.out.println("String s ==="+s1);

        //list
        commands.lpush("myList3", "v1","v2","v3");
        List<String> list2 = commands.lrange("myList2", 0, -1);
        list2.forEach(System.out::println);


        conn.close();
        client.shutdown();
    }
1
2
3
4
5
6
7
8
9
10
11
12
13
14
15
16
17
18
19
20
21
22
23
24
25
26
27
28
29
30
31
32
33
# 4.集成RedisTemplate-推荐使用⭐
# 4.1 单机使用
添加依赖
<dependency>
            <groupId>org.springframework.boot</groupId>
            <artifactId>spring-boot-starter-data-redis</artifactId>
        </dependency>

        <dependency>
            <groupId>org.apache.commons</groupId>
            <artifactId>commons-pool2</artifactId>
        </dependency>

        <dependency>
            <groupId>com.github.xiaoymin</groupId>
            <artifactId>knife4j-openapi3-jakarta-spring-boot-starter</artifactId>
            <version>4.4.0</version>
        </dependency>
1
2
3
4
5
6
7
8
9
10
11
12
13
14
15修改配置
# springdoc-openapi项目配置
springdoc:
  swagger-ui:
    path: /swagger-ui.html
    tags-sorter: alpha
    operations-sorter: alpha
  api-docs:
    path: /v3/api-docs
  group-configs:
    - group: 'default'
      paths-to-match: '/**'
      packages-to-scan: org.clxmm.controller
# knife4j的增强配置,不需要增强可以不配
knife4j:
  enable: true
  setting:
    language: zh_cn


spring:
  data:
    redis:
      host: 192.168.1.106
      port: 6379
      password: 123456abc
      database: 0
1
2
3
4
5
6
7
8
9
10
11
12
13
14
15
16
17
18
19
20
21
22
23
24
25
26java代码
package org.clxmm.config;

import org.springframework.context.annotation.Bean;
import org.springframework.context.annotation.Configuration;
import org.springframework.data.redis.connection.lettuce.LettuceConnectionFactory;
import org.springframework.data.redis.core.RedisTemplate;
import org.springframework.data.redis.serializer.GenericJackson2JsonRedisSerializer;
import org.springframework.data.redis.serializer.StringRedisSerializer;

@Configuration
public class RedisConfig
{
    /**
     * redis序列化的工具配置类,下面这个请一定开启配置
     * 127.0.0.1:6379> keys *
     * 1) "ord:102"  序列化过
     * 2) "\xac\xed\x00\x05t\x00\aord:102"   野生,没有序列化过
     * this.redisTemplate.opsForValue(); //提供了操作string类型的所有方法
     * this.redisTemplate.opsForList(); // 提供了操作list类型的所有方法
     * this.redisTemplate.opsForSet(); //提供了操作set的所有方法
     * this.redisTemplate.opsForHash(); //提供了操作hash表的所有方法
     * this.redisTemplate.opsForZSet(); //提供了操作zset的所有方法
     * @param lettuceConnectionFactory
     * @return
     */
    @Bean
    public RedisTemplate<String, Object> redisTemplate(LettuceConnectionFactory lettuceConnectionFactory)
    {
        RedisTemplate<String,Object> redisTemplate = new RedisTemplate<>();

        redisTemplate.setConnectionFactory(lettuceConnectionFactory);
        //设置key序列化方式string
        redisTemplate.setKeySerializer(new StringRedisSerializer());
        //设置value的序列化方式json,使用GenericJackson2JsonRedisSerializer替换默认序列化
        redisTemplate.setValueSerializer(new GenericJackson2JsonRedisSerializer());

        redisTemplate.setHashKeySerializer(new StringRedisSerializer());
        redisTemplate.setHashValueSerializer(new GenericJackson2JsonRedisSerializer());

        redisTemplate.afterPropertiesSet();

        return redisTemplate;
    }
}
1
2
3
4
5
6
7
8
9
10
11
12
13
14
15
16
17
18
19
20
21
22
23
24
25
26
27
28
29
30
31
32
33
34
35
36
37
38
39
40
41
42
43
44业务类
@Tag(name = "订单接口")
@RestController
@Slf4j
public class OrderController
{
    @Resource
    private OrderService orderService;

    @Operation(summary = "新增订单")
    @RequestMapping(value = "/order/add",method = RequestMethod.POST)
    public void addOrder()
    {
        orderService.addOrder();
    }


    @Operation(summary = "按orderId查订单信息")
    @RequestMapping(value = "/order/{id}", method = RequestMethod.GET)
    public String findUserById(@PathVariable Integer id)
    {
        return orderService.getOrderById(id);
    }
}

@Service
@Slf4j
public class OrderService {
    public static final String ORDER_KEY = "order:";

    @Resource
    private RedisTemplate redisTemplate;

    public void addOrder() {
        int keyId = ThreadLocalRandom.current().nextInt(1000) + 1;
        String orderNo = UUID.randomUUID().toString();
        redisTemplate.opsForValue().set(ORDER_KEY + keyId, "京东订单" + orderNo);
        log.info("=====>编号" + keyId + "的订单流水生成:{}", orderNo);
    }

    public String getOrderById(Integer id) {
        return (String) redisTemplate.opsForValue().get(ORDER_KEY + id);
    }
}
1
2
3
4
5
6
7
8
9
10
11
12
13
14
15
16
17
18
19
20
21
22
23
24
25
26
27
28
29
30
31
32
33
34
35
36
37
38
39
40
41
42
43
# 4.2 集群使用
修改配置
spring:
  data:
    redis:
      host: 192.168.1.106
      port: 6379
      password: 123456abc
      database: 0
      ## 集群支持配置
      cluster:
        nodes: des=192.168.111.175:6381,192.168.111.175:6382,192.168.111.172:6383,192.168.111.172:6384,192.168.111.174:6385,192.168.111.174:6386
1
2
3
4
5
6
7
8
9
10
11问题
人为模拟,master-6381机器意外宕机,手动shutdown。
先对redis集群命令方式,手动验证各种读写命令,看看6384是否上位。
Redis Cluster集群能自动感知并自动完成主备切换,对应的slave6384会被选举为新的master节点
微服务客户端再次读写访问试试
SpringBoot客户端没有动态感知到RedisCluster的最新集群信息
【故障演练】 Redis Cluster集群部署采用了3主3从拓扑结构,数据读写访问master节点, slave节点负责备份。当master宕机主从切换成功,redis手动OK,but 2个经典故障
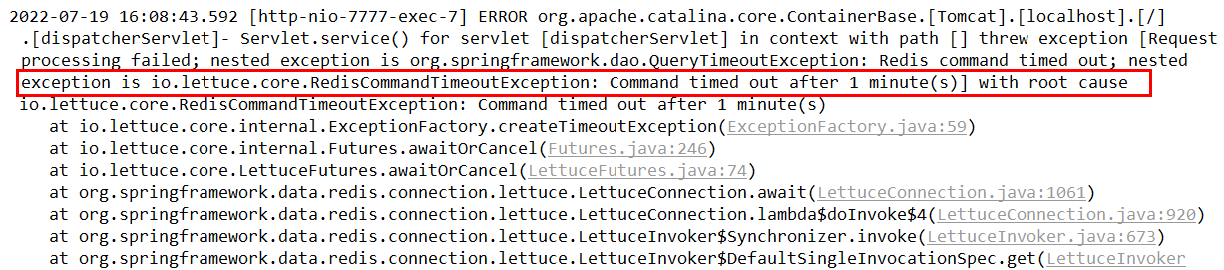

原因
SpringBoot 2.X 版本, Redis默认的连接池采用 Lettuce。当Redis 集群节点发生变化后,Letture默认是不会刷新节点拓扑
解决
- 1 排除lettuce采用jedis(不推荐)
- 2 重写连接工厂实例(极度不推荐)
- 3 刷新节点集群拓扑动态感应 https://github.com/lettuce-io/lettuce-core/wiki/Redis-Cluster#user-content-refreshing-the-cluster-topology-view (opens new window)
修改配置
spring:
  data:
    redis:
  #    host: 192.168.1.106
      port: 6379
      password: 123456abc
      database: 0
      ## 集群支持配置
      lettuce:
        cluster:
          refresh:
            adaptive: true
            period: 2000
      cluster:
        nodes: 192.168.111.175:6381,192.168.111.175:6382,192.168.111.172:6383,192.168.111.172:6384,192.168.111.174:6385,192.168.111.174:6386
1
2
3
4
5
6
7
8
9
10
11
12
13
14
15
16
17
编辑 (opens new window)
上次更新: 2024/09/05, 22:27:21